Showing posts with label crafts. Show all posts

Thursday, April 21, 2016

Etsy Shop!!


Well I finally did it yall!  I finally made an Etsy Shop!  Ok so some of you are probably not very impressed but if you knew me you so would be.  See I have LOTS of ideas but well then I get to worrying about everything and I will talk myself out of them or with 3 little boys I get side tracked. 

I have wanted to open an Etsy shop for about 4 years.  I was sewing a lot and making the cutest little things and well someone needed to buy them, of course.  But I was a chicken.  I was scared to take the plunge and Etsy was new so I did not trust it yet and well I was just nervous.  So instead I would go to one little craft fair each year and take my goodies there.  Problem was, the event was always outside and it was cold and well I didn't know much to help make myself successful. 

I was more concerned that no one felt pressured or that I was too expensive so I was a terrible sales man.  I would speak to someone at my table and answer a few questions but end it with "but don't feel pressured to buy anything."  (I actually still really do that way too much but gosh I want people to know I am trying to be helpful but not pushing, so don't want anyone to ever feel like I am being pushy.)  And my prices were always way lower than everyone else that was selling the same thing and then I would still feel guilty if it was someone I knew and feel I should make it cheaper.  I have learned that being polite with prices is not the best way either.  People think something is wrong with your product.  Example- I was making adorable little dresses and I only charged around $12-15 for each one.  (didn't want to rip anyone off to make a profit so I only asked a little more than the material I had in each piece- never thought to consider my time and energy)  Well I would have people come look at mine and ask the price and then go look somewhere else and pay double for the same item.  It blew my mind.  I mean really who does that!?  I am all about a good deal.  Well this happened several times and I had a friend tell me it was because they were too cheap.  (Really can anything ever be too cheap! Not in my opinion)  I also had the lady at the fabric counter tell me the same thing when I was buying material one day.  She worked events and said low prices were not the best, people that your product was cheap then.  Well it still baffled me.  I mean look at my quality was always the same or sometimes better.  But it is a lesson I have learned is true so I am trying to do better with my pricing and taking my time and effort into consideration. 

Well my sewing days have kinda fallen to the side but I have been making cute wooden things and just got a Cricut to work with vinyl.  (So excited!!)  Well we are getting ready to finally build a house and I want to help out some with the bills so I decided to bite the bullet, pull the trigger, jump off the bridge, (sorry but it really was dramatic for me), take the plunge and open *gasp* my Etsy shop. 

Ok after all that drama it should be this big wonderful thing right!  With like 50+ items right!  Well nope, try more like 5 items (hey I just started) and not a whole lot of frill and flare.  I did however design me a little graphic to go with my shop name today and I am working on making a banner.  But as little and insignificant as it is I am super excited about it.  Not sure if it will get any traffic but hey going to give it a go. 

So if you are inclined stop by and take a peek at my little shop.  I am hoping to fill it up soon and I will be sharing all about it here.  **Yay!**  I know you are excited ;)

My Blessed Mess Gifts
And let me know what you think about it.  Seriously I am sure I really need some good advice.  Thanks and happy Thursday!!
Andrea

Friday, April 15, 2016

Some things I am up to

Ok today has to be a quickie because it is a BUSY weekend filled with birthdays and parties.  I did want to give you a little teaser of what I have been up to craft wise.

Next week I will be sharing more about some wooden cutouts I have been working on.   


And then these lovelies!  Ahh just so pleased with them. 


I was riding down the road from dinner one night when these popped in my head and my wonderful hubby helped turn my idea into reality.  So happy with them.  Of course one is going on my door or wall and the rest will make it to my Etsy shop.  (coming soon)


Here is some handprint crafting I did with my boys.  Love these duckies and they look great in the bathroom.


Here is a piece my hubby made that I will give some details about.  I just love handmade furniture and if he can think it up he can build it.  Blessed girl!


I made some cheap and easy monogramed decorations for my cleaned off TV cabinet.  They are not perfect but I am perfectly happy with them. 


 And last not but not least I now have finally trying my hand with some vinyl.  So excited and pleased with how they have come out.  One is for my father in laws birthday and the others will make it to Etsy. 


 So make sure you stop back by to see these projects and many more.  Plus I will have a cake recipe coming up.  Have a wonderfully blessed weekend!!
 
Andrea

Wednesday, October 31, 2012

Happy Halloween

Fall is officially here and today is Halloween.  I love the fall.  Love it!!  Love the colors, the weather, the smells, the food, and the holidays.  I just love the way it makes you feel.  But with this fall I have been super super busy.  I have had the kiddos costumes planned for months and since they were not difficult I have put them off.  Well I put them off till this morning, yeah just a tad bit late.  Well I managed to finish my big guys without any problem and will have 10 minute tute for you later this week but I did not get my littlest man's finished.  In all honestly I could have made it in time but it turned out a bit small so I was going to have to cut a slit up the back and add snaps and well it just wasn't worth it.  But I will tell you all about my busy day later, right now I just wanted to share the cuteness of my kiddos. 


My oldest wanted to be a Builder (Bob the Builder) Here is a pic of him in his tool belt but without his hat. 


And my baby is one of the cutest pumpkins out there.  Well in my opinion at least.


Aren't they sweet together?


Here is the whole crew.  My hubby was not much for dressing up this year but I tried to have some Halloween spirit with my shirt.

I hope you all had a wonderful Halloween!

Wednesday, October 10, 2012

I'm in Business


photo from Paparazzi Website
 
While I was away for 2 months,  I started my own business.  I am now the proud owner of "Polka Dots and Pincushions."  It started as a little crafting business with my cousin and has grown in the past few months to include jewelry and another cousin. 

I had been crafting and sewing for local friends for about 2 years but with two small children and very limited space the time for sewing became limited.  I then stumbled upon Paparazzi Jewelry and now I am  Independent Consultant  #7657.  (Haven't heard of it or interested in finding out more let me know I would be happy to talk with you.)

I have a Face book page where you can view all of my items and I am hoping to have a web page in the future.  I am having a great time selling cute $5 jewelry and accessories.  I love that I don't have to be pushy or bring a financial burden on anyone.  I always dreaded  getting invites to parties for Thirty One, Scentsy, etc  because I can not afford that stuff.  I think they are great companies with super cute items but being a stay at home mom means well, sometimes,  staying at home.  If I want to be able to afford to be home with my kiddos then I can not afford to spend money on $40 bags and $20 candles.  So when I heard about Paparazzi and found out that it was only $5, I had to find out more. 


Now I am booking parties, selling at events, and selling online.  I love it and I don't have to feel bad because 1- I don't have to be pushy, if you like it great if you don't that is ok too and 2-it is affordable so it is not like I am asking them to spend a fortune.  It is win win! 

I will tell you more about my Paparazzi experience in my another post but for now I wanted to share some pics of a few of the items on my page.  If you have any questions please feel free to ask or email me.  And if you are interested in anything please check out my face book page Polka Dots and Pincushions and order from there. 
Thanks
Andrea
Independent Consultant 7657
 
Here are a few pictures of some of the jewelry.  I also have rings, bracelets, and hair accessories.


Here are a few of my hand made items.


Friday, July 13, 2012

Devotional Frame


Are y'all as busy as I am?  I am sure you are, and having a new little one gives busy a whole new meaning.  When my littlest man arrived early we were not ready for him and I feel like I have been running to catch up since then.  In trying to find time for everything I needed to do and for a few things I wanted to do, I realized that I kept cutting my devotional time.  I stilled prayed but it was a hurried prayer and revolved mainly around my family.  I didn't take the time to read anymore and with orders to not have the baby exposed to any germs we didn't attend church for almost 3 months.  So not only was I not getting any spiritual time at home I wasn't getting any at church.

At night or in the shower when I had a moment to myself I would think about it and tell myself I would strive for better tomorrow.  Well better took a few weeks but I found some devotional ideas online that we could do as a family.  Not only did I want my own time I wanted to make sure I had a daily devotional as a family and instilled it in my children early. 

I found some great ideas online that I will share with you, but I wanted to show you my devotional frame.  

I started off with a prayer tent (explained below) but I knew I wanted something I could use week after week and not have to make, also something that I would see everyday that would serve as a reminder in case I got busy again.  I had seen people use old windows for decorations and organizations and I thought why not a picture frame.   I planned out how many spaces I would need a bought a frame that size. 

I wanted a spot for people/situations that we need to pray for.  A place to list some of the blessings we have received that week/things we were thankful for.  A spot for a bible verse that we could all learn and a place to write down the bible story I would be reading to my little people that week.

I found a very cheap frame at Michael's and then bought 2 different colors of scrap booking paper.  I used black letter stickers to title each square.  Prayers-Blessings-Memory Verse-Bible Story

I hung the frame in the kitchen so that I know we will see it each day and so that we can incorporate it when we pray over dinner and while we talk.  I use a dry erase marker to change the info each week.


I try to make sure my kiddo helps come up with at least one blessing and one thing/person to pray about. 


Ok here are a few more ideas I found that I thought were great.

*Prayer tent-each week you fold a piece of paper into the shape of a tent (triangle).  Let your little one decorate it and then write at least 3 people/situations that you need to pray about on it and take it out during your devo time.

*God's creations walk- take a walk and really stop and look at and discuss all that God has made and given us.  Take in the wonder of all his wonderful creations.

*Prayer in the car-if you go past someone that is pulled over, broke down, or an abandoned car you can say a prayer for that person and their situation, or pray for the family in a house you pass by.

*Read a Bible story at night and discuss how it made you feel, or child feel, how did the people in the story feel?  How did God work in that story?

*Tithe-change a dime into 10 pennies and put give 9 to your child to put in his piggy bank and 1 in the Jesus Jar to show giving a 10th.  As they get older you can give them more and they can take what they have earned to give a 10th.

*Praise-devotion with music learn Praise songs and have time to sing and dance to the Lord to show Praise and Love.
These ideas came from Focus on the Family and a squidoo.com search.  I hate that I am not giving credit where credit is due but I can not find that page again.  They were written by a mother that had 3 girls I think.  Sorry again but I just searched on google and stumbled across her info, but I did not think about writing it down.

So what do you do for devotional time?  What are some neat ways you share God with your kids or carve out time for yourself?

As a side note my husband and I teach our youth at church 7-12th grade and I would love any ideas for activities to do with them.  If you have some great ideas please share.  Have a wonderful weekend and take time to enjoy God's blessings.
Linking to some of these wonderful parties:


Thursday, June 14, 2012

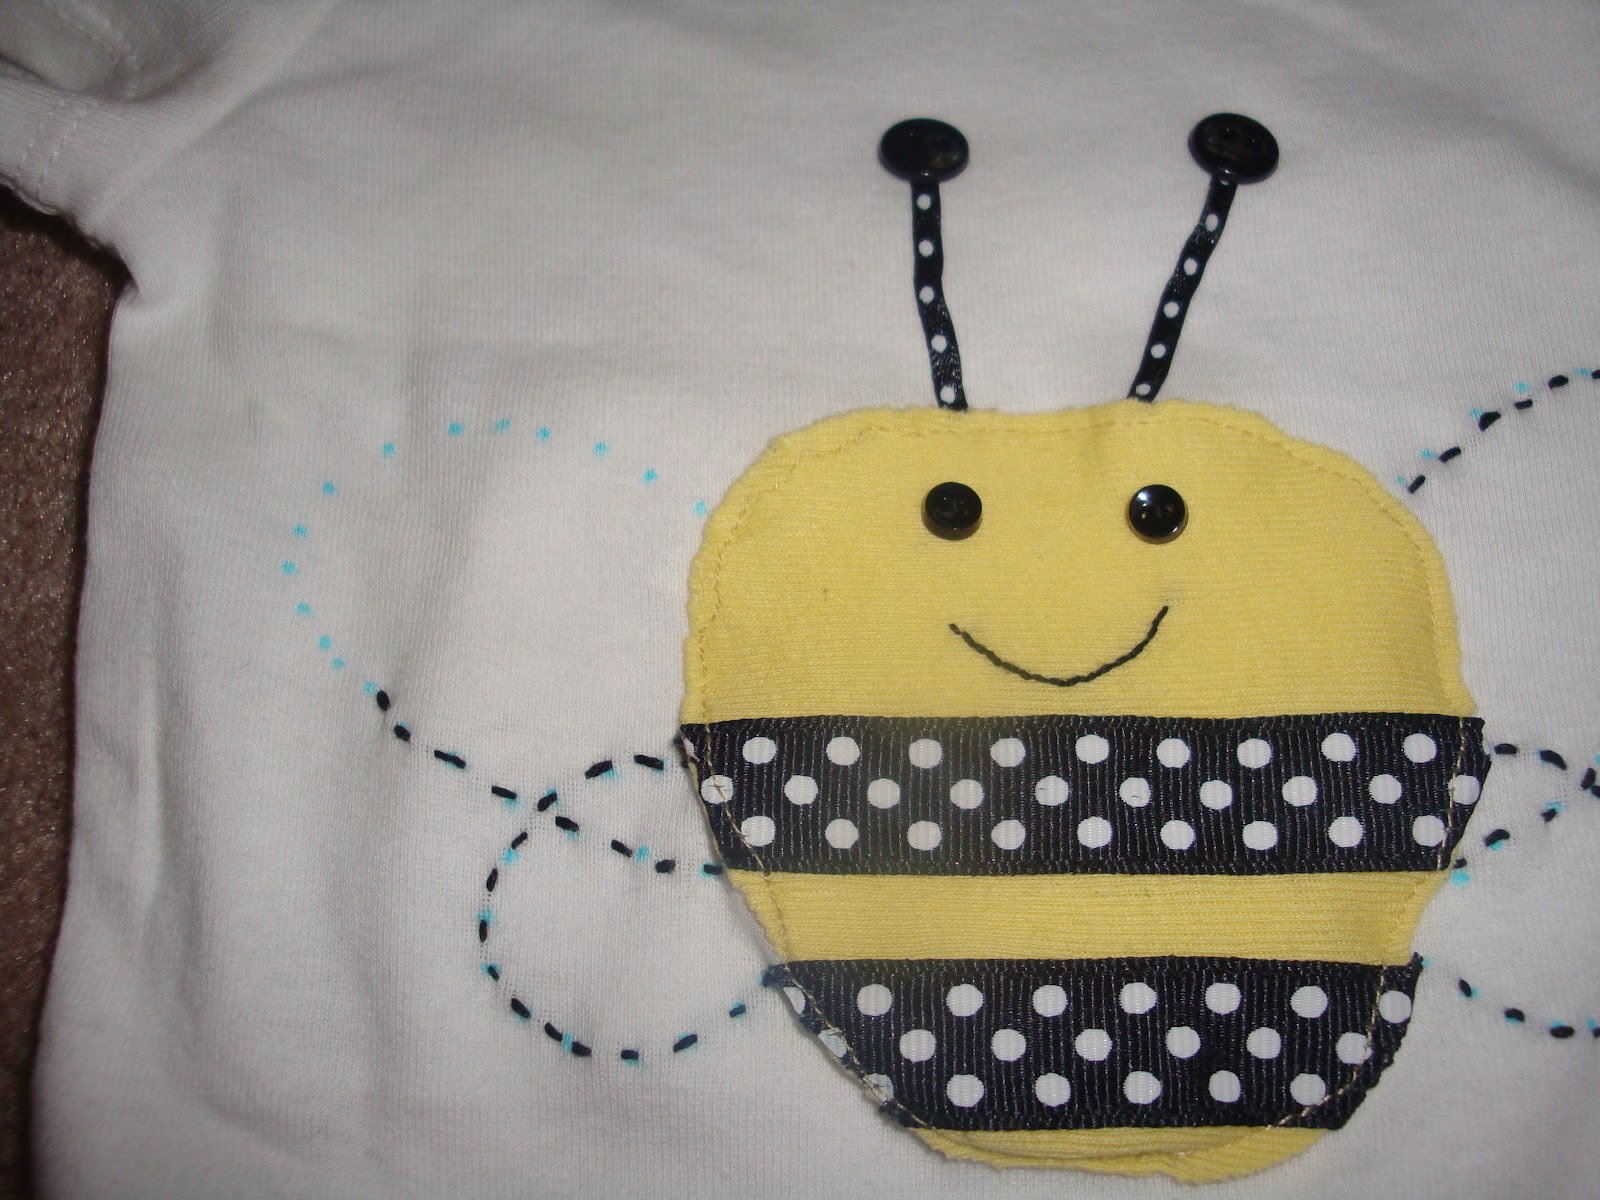
Bumble bee onesie

I saw the cutest little onesie at the store a few months ago.  It had a bee on it and was just adorable but it cost around $20.  Way too much for a onesie, especially when I figure I can make my own for much cheaper.  I have not been blessed with little girls yet so this is for a friend (and hopefully she will not check my blog before I have time to give it to her) and maybe in a year or two we will be able to swap out clothing so I can put bows in a baby's hair and she can dress up a little man.  :)


sorry I don't know how to make the pictures rotate if someone does please inform me but cute huh?

See isn't that adorable.   Want to make your own?  Ok all you need is a plain onesie (it doesn't have to be white I think most any color would work), some yellow material (mine was an old scrap t-shirt), white material (again mine was a scrap t-shirt), tiny black buttons, small black buttons, 3/4 in black ribbon, 1/4 in black ribbon, sewing machine, gray/black embroidery thread  (Again with almost all my projects this is just what I used.  Play around with sizes and material.  I bet a bee would be cute with big buttons for eyes too.)

1st thing is to decide how big you want your bee to be.  Cut out the basic body shape, by folding your material in half so that it will be symmetrical.  Then lay out your material on your shirt to make your bee and see where you want everything and how you want to space it.  I used an erasable ink marker to put dots where I wanted the eyes, mouth, etc.  You also need to cut your ribbon to length and the right shape.  Lay your ribbon on the bee body and trim it just a bit larger than needed.  Then heat seal the edges with a lighter. 


Now sew on your eyes by hand and stitch your mouth on.  Look it is cute already.  ;)  Next are your stripes.  You can hand sew them on, use stitch witchery, your machine, etc.  My material is really small and thin so I decided to hand stitch them on.  It was a little more time consuming but I am happy with the result.


Now that you have your bee all put together pin it to your onesie and stitch it on with your sewing machine.  (you could sew it on by hand if you don't have a sewing machine) My machine wanted to fight with me for some reason but we made it around finally.  After the body is attached you will want to hand stitch the antenna down and add the buttons. 

You could stop here but I felt my bee needed wings.  I used my erasable ink to make the design of my wings and then just hand stitched them on using embroidery thread. 

I wasn't completely satisfied with my onesie and wanted to add some cuteness to the back.  I was going to make some ruffles across the bum but then decided that a bee needed flowers.  I made some super simple flowers out of the same yellow and put a little white in for contrast.  I just traced 3 different sized circles on my fabric, cut them out, and added a button in the middle.  Pretty cute huh? 

The bee went together fairly easy because all my fabric was knit and would not ravel so I did not have to work about frayed edges. 
You could do the same thing but use a more "manly" :) animal for a boy. 

Wednesday, June 6, 2012

Kitchen chair refashion


I am so excited about my post today because it is something I have been wanting to do for about a year and now that I finally got around to doing it, I love it!!  Over a year ago we bought a table off of a yard sale site and though it was in ok condition the cushions were not pretty.   They were your basic brown suede.  Well after looking around Hancocks for a while I found some material I LOVED and as an extra bonus I had a coupon!  Don't you just love coupons.   Well life got busy and I never took the time to stop and cover my cushions, until now.  And as just a side note it was really easy and quick.  I should have taken the time sooner but well then I probably wouldn't have photos to share.  If you need a complete step by step tutorial just google chair recovering and there are plenty of videos.  That being said it really is simple and only takes about an hour and a half start to finish.

BEFORE

Ok first thing unscrew your cushion from your chair.  Then you will want to either measure your seat so you can cut out the right dimensions or you can do what I did and just trace it.  Lay your fabric out on a smooth level surface.  I just used my living room floor.  I doubled my fabric so that I only had to trace and cut twice.  I am an unprofessional, lazy, quick crafter so if you want the proper way to do things well this post is not for you and most of my projects will not be up your alley.  I don't do a lot of technical measuring with cooking or crafting.  I like to look at it or taste as may be the case and kinda improvise as I go.  Sometimes it works out for me and sometimes it doesn't, sometimes it is a happy accident.  Ok that bit of disclosure out of the way, now we can get back to the chairs.  (sorry I tend to ramble and rarely remember to step on the clutch) :)

So lay your cushion down on your fabric and trace/cut around the seat going out at least a good 5 inches.  If in doubt pick up your fabric and test it.  I went as close as I could so that I could save all the extra fabric for some curtains (coming later this week or next).  After you have all four pieces cut out get your staple gun or air gun and prepare to staple.  Center your cushion on your material and start at the front (typically your widest side) and pull your material taunt and staple in the middle.  Do this for the other 3 sides adding just one staple to the middle.  After each side had been secured go back and staple each side down with at least 4 more staples.
sides stapled and working on the corners (I put my hubby to work with the staple gun)

Now time for the corners.  Pull/fold in your corners getting them as tight as flat as you can.  Make sure they do not make creases in your fabric that show on the top.  Staple your corners down with at least 2 staples.  Then trim off all excess material getting fairly close to the staples.  Now flip your cushion over and admire your newly covered seat.  Ahhhh

You can stop here and reattach your seat or you can get some felt or other cheap/non raveling material and cover up your work.  Depending on how much excess material you have hanging will determine if it is an important step. 

I am in love with my new cushions.  They make me smile every time I look at them.   Oh goodness I almost forgot to save my new lovely fabric I gave my cushions a good dose of Scotch Guard.

Linking to some of these great parties
            www.watchoutmartha.net
            www.funkypolkadotgiraffe.blogspot.com
            www.ladybug-blessings.com
            www.sugarbeecrafts.com
            www.creationsbykara.com
            www.733blog.com
            www.somedaycrafts.blogspot.com
            www.sugaranddots.com
                 http://bec4-beyondthepicketfence.blogspot.com
            www.katiesnestingspot.com
                www.chickenscratchny.com
            www.shabbynest.blogspot.com
            www.kojo-designs.com
            www.oneartmama.blogspot.com
            www.504main.com

Monday, June 4, 2012

John Deere Baby set - Lovey Blanket

Well today is part 3 of my baby set.  If you missed the burp cloth and the bib you can find them here and here.  OK so now on to the lovey blanket.  Like with the other two there are several different ways to make these.  I am only going to share one way today but if you have any questions feel free to ask.  Because I will apologize ahead of time that I did not take step by step pictures.

For my blanket I used flannel material because it is just softer.   So supplies you will need- 1/4 yard of two different materials (for your front), 1/2 yard of backing material, several different colors and textures of ribbon, a square (or object you can use of a square), and a sewing machine.

my square ;)
I made my lovey in a patchwork fashion, kinda like a quilt but with out the padding.  If you wanted the extra time you could definitely go back and add stuffing and quilt around the edges but I was fast and lazy.  :)  I only used two different colors of material for this blanket, the John Deere print and then a plain yellow for contrast and the backing.  You start by tracing out 9 squares.  I do not have a technical square so I use the top of a cd case.  :) Ok no laughing it works and it did not cost me a thing I just stole the top off of one of my cds.  Again you could make this blanket so many different ways.  You could make it bigger by adding more squares, or you could have several different patterns going on, or make it completely solid, etc.  I have made mine in a variety of patterns and styles, so this is only one way, feel free to experiment. 

Anyway to make this blanket, trace and cut out 5 squares from your 1st fabric and 4 squares from your second fabric.  Then you will need to serge/sew your squares together in rows of 3.  After you have your rows, sew them together to form your front.  Then lay your front layer on your backing fabric and trace out a large square to match it's size.  Again so sorry I do not have pictures but feel free to ask if you are confused.  I would add a drawing but that is something I have not learned how to do just yet, still super new to blogging.  I went back and took some pictures of a different blanket just for you!  Don't you feel loved now. :)
sewing squares together

cut out squares of fabric

Your 3 separate rows                                 2 rows sewed together


all sewn together


Now that you have both of your pieces, you need to decide how many ribbons you want on your blanket and how long you want each piece.  I chose 4 different colors with all the same texture but different widths.  Cut your ribbon to the length that you want and lay them out on your top piece to decide what kind of pattern you want.  Once you have decided on how you want it to look, you will want to pin your ribbon the the right side of the front piece.  I know that sounds funny but you will sew it tucked in so that when you turn your blanket the right side out your ribbon will be attached neatly on the inside.  So pin your ribbon so a little hangs over the edge of your material and the rest of the ribbon lays on your front piece.
(Here is a pic of another blanket I will show later)
I hope you can tell the ribbons have been pinned up with a little bit of over hang to catch when you sew.


Then pin your backing piece right side down on the ribbon to your front.  (I feel like this sounds confusing)  Make sure you leave a 1 inch opening so that you can turn it inside out.  I like to put several little pins where I am not going to sew to remind myself to stop.  Cause once I get going well sometimes I just keep going.  ;)   Now you can serge it closed or sew it on a regular machine.  I have done both but since I have a serger now I just love it!

After it is sewn together, push/pull your blanket right side out.  Tuck your extra fabric in your opening and then you can top stitch it closed or hand stitch it.  Most people think top stitching all the way around is more professional looking but again it is your choice.

Well this is probably one of my longest posts but I felt it was a tad confusing.  Please come back later this week I have a chair redo that I am just so tickled with!  Have a great day!
Linking to some of these great parties: